Introduction of Cell Sorting in a BSL-3 Facility
Over the past decade, there has been a rapid growth in the number of BSL-3 and BSL-4 laboratories in the USA. Concurrently, there has been an increase in demand for cell sorting in BSL-3 laboratories and therefore requirements to conduct these experiments safely. This chapter outlines procedures for infectious cell sorting in a BSL-3 environment, including containment verification, remote operation, disinfection, personal protective equipment (PPE), and instrument-specific modifications for enhanced aerosol evacuation. This chapter assumes that the laboratory director has performed a careful risk assessment and determined that the sample(s) (infectious agent) must be sorted in a BSL-3 laboratory. General BSL-3 laboratory procedures and physical requirements are detailed elsewhere. The procedures presented here are considered special practices that are specific to the laboratory procedure of cell sorting and can be used as a guideline for the formulation of laboratory specific Standard Operating Procedures (SOPs). The SOPs identify hazards and specify procedures designed to minimize those hazards and are determined in part by instrument-specific design features.
In 2007, the International Society for Advancement of Cytometry (ISAC) Biosafety Committee has published standards for sorting unfixed cells. This document was driven by the following practices and procedural advances:
- Advances in cell sorter technology made high-speed cell sorting more prevalent and changed the biohazard potential of cell sorting experiments.
- New, easy-to-use options for the personal protection of operators have become available.
- Instrument manufacturers responded to the need for improved operator protection and have introduced instrumentation containing novel safety features.
- Newly designed safety modifications for cell sorters have become commercially available.
- With the availability of compact, easy-to-operate sorters many more laboratories have incorporated cell sorting into their experimentation, but often do not have dedicated operators to perform cell sorting experiments.
- Simpler, bead-based techniques for measuring the efficiency of aerosol containment during cell sorting have been developed.
- The growth of research in emerging infectious disease and bioterrorism has increased the need for live infectious cell sorting.
These standards and procedures are now in-place for the flow cytometry community conducting infectious cell sorting experiments. It is important to note that the assignment of appropriate procedures and practices for samples with variable and sometimes complex levels of biohazard risk potential, such as genetically engineered cell preparations and a variety of unfixed but "pretested" samples still remain in debate. Currently, the ISAC Biosafety Committee together with a special National Institutes of Health (NIH) Safety Committee and the American Biological Safety Association (ABSA) are involved in updating these standards. A primary goal for these groups is to clarify the risk assessment procedures for the assignment of biosafety practices when sorting "questionable" samples, i.e., to match engineering controls with potential risk. Furthermore, these updates provide a foundation for modernizing the risk assessment to reflect the present knowledge and occupational safety practices as outlined in the Centers for Disease Control (CDC) and NIH sponsored document, the Biosafety in Microbiological and Biomedical Laboratories (BMBL).
In 2009, the most important changes in the practice of infectious cell sorting are in the procedures for measuring containment, advances in instrument design and PPE. The common and now widely accepted procedure for measuring aerosol containment on a cell sorter is the Fluorescent Glo-Germ procedure, which has replaced the more complex bacteriophage procedure. Advances in instrument design have included the improvement of the efficiency of the aerosol evacuation system. The critical importance of respirator protection is unchanged, but for laboratories utilizing powered air purifying respiratory (PAPR) devices, there is a new model of PAPR helmet system which offers novel design features. This PAPR is approved by the National Institute for Occupational Safety and Health (NIOSH); it consists of a HEPA filter hood with face shield attached to a light-weight helmet-based fan resulting in a hose-free PAPR system. Combined with a full body Tyvek suit, this system provides full body protection and increased mobility.
Methods of Cell Sorting in a BSL-3 Facility
Laboratory Design: Special Physical BSL3 Laboratory Requirements
If the risk assessment determines that the cell sorter to be placed within a BSL-3 laboratory does not require containment within a Class II BSC.
Installation of BSC and Modification of a Cell Sorter to Facilitate Operation Within a BSC
- Install the BioProtect II Class II BSC. This model encloses the entire instrument, fluidics cart, and AMS of the FACS Aria cell sorter. The size of this hood (9'4″W×8'9″ H×4'1″D) necessitates careful planning before the installation of this unit.
- Place the FACS Aria on a table with adjustable legs (and casters). Note that the table supplied with the FACS Aria I is not at the correct height to match the BioProtect II Class II BSC front grille.
- Install a gas spring (20 lb force) on the flow cell access door of the FACS Aria. The access door to the flow cell and sort chamber is normally closed during sorting. As designed, it is hinged so that when fully opened it rests on the top of the instrument cover. However, it is not possible to easily reach the access door in this position through the sash opening of the BioProtect hood. Installation of a gas spring on the access door will permit the door to be easily opened and closed through the hood sash opening.
Modification of a Cell Sorter to Facilitate Operation Within a BSL-3 Laboratory
Remote operation of the cell sorter is feasible using software for remote viewing of the acquisition computer. However, the levels of sample and collection tube volumes are not available from the acquisition software. Installation of CCD cameras with video capture on the acquisition computer allows remote monitoring of these parameters.
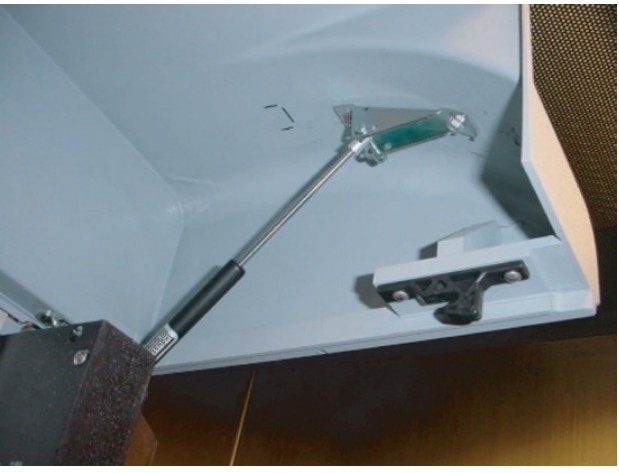 Figure 1. Installation of a gas spring on the access door will permit the door to be easily opened and closed through the hood sash opening.
- Install PC remote control software packages, such as PCAnywhere on the acquisition computer. Ideally, sorting of infectious samples should be done in a location remote from the cell sorter to minimize the risk of exposure. However, full remote operation of cell sorters is not available with current models, but most can be controlled through the acquisition software. Once sorting has been initiated, sorts can be monitored remotely. Equally important is the ability of clients to view their sort sample setup without the necessity of entering the BSL-3 lab.
- Place small black-and-white CCD cameras in front of the sample chamber and inside the collection chamber. Send output to a video capture card on the acquisition computer.
- Install an uninterruptable power supply to provide power backup for the cell sorter, acquisition computer, and AMS. It is critical when sorting infectious agents that power to the cell sorter, computer and AMS is protected from power dropouts or failures. Although many labs have automated power backup generators, switching to auxiliary systems may cause instru ments and computers to shut down.
Preparing a BSL-3 Cell Sorter
Modification of a Cell Sorter for Improved Aerosol Evacuation
The AMS of the FACS Aria I and II is designed primarily for the evacuation of the collection chamber (area containing tube holders or 96-well plate holder). However, the sort chamber, containing the nozzle and deflection plates, is designed to contain aerosols generated during normal sorting or after a clog. With the tube holders in place, there is no direct communication between the collection chamber (and associated aerosol evacuation system) and the sort chamber. The consequence of this design is that following a clog-induced stream deviation, aerosols in the sort chamber are not efficiently evacuated, permitting aerosol escape when the sort chamber is opened. Simple modifications to the FACS Aria sort chamber and tube holder in conjunction with the existing AMS allow efficient evacuation of aerosols in the sort chamber.
- Tube holder modification: Drill 3½″ holes in the upper portion of the tube holder (Aria I) or the Universal top component of the tube holder (Aria II).
- Sort chamber door modification: Drill a single hole into the sort chamber door at the top using a size 3 (wire gauge size) drill bit. Thread this hole using a ¼″-28 hand tap. The tapped hole accommodates a female Luer thread style fitting with a 5/16″ Hex to ¼-28 UNF Thread, into which a 0.22 mm syringe filter with Luer male fitting is inserted.
Aerosol Containment
While sorting viable infectious material (infected cells) the following guidelines must be followed for proper aerosol containment. All sort operators must be trained and certified by the flow core facility prior to any cell sorting operations.
- Turn on the AMS and verify that it is functioning according to the manufacturer guidelines. The vacuum monitor should be set to 20% and the vacuum gauge must read between 1.0 and 1.5 in. of Water Column (WC).
- Change the HEPA filter if: (a) the vacuum monitor gauge reads 2.4 in. of WC or greater at 20% flow; (b) the red filter indicator LED is blinking; or (c) 6 weeks has passed since installation of the filter.
- Fill the sheath waste tank with enough sodium hypochlorite to provide a final concentration of 10% when full (1 L of household bleach to a final 10 L of waste collected). If full, empty before starting cell-sorting procedures and allow at least a 30-min contact time before disposal.
- Verify that the sort chamber camera system is functioning normally according to the manufacturer guidelines. This camera system is used to monitor the sort stream and alerts the operator to potential increased aerosols. In this situation, the operator can correct the sort stream and reduce aerosol contamination. The FACS Aria is equipped with a "Sweet spot," which is used during all sorting operations. This device is used to monitor the normal sort stream drifts and corrects position by automatically adjusting the sort wave amplitude. If a stream blockage is detected due to cell aggregates, the "Sweet spot" will automatically shut down the stream and close the sort drawer.
Measurement of Containment and Tolerances
The most widely accepted method of containment testing is Glo-Germ bead method. The AMS must be tested under simulated worse case "failure mode." In this mode, the instrument is set to 70 psi and particles are concentrated to approach speeds of approx. 20,000–50,000 particles/s. The stream is forced to glance off of waste catcher shield to create a large plume of aerosols. This is accomplished by covering the waste aspirator with a disposable rubber shield or by diverting the stream to hit the side of the waste aspirator using the sort block adjustment screws.
- Add a clean glass slide to the AeroTech™ particle collector. Place the AeroTech™ device directly on top of the sort collection chamber or in other local positions. Adjust the flow to the AeroTech™ device to 50–55 SLPM (standard liters per minute) as measured by an air flow meter attached to the laboratory vacuum source equipped with a 0.45 mm vent filter with hydrophobic membrane (such as the VacuShieldTM). Close the sort block door but do not install tube holders. Close the main sort collection chamber and place the AeroTech™ device directly on top of this chamber door.
- Turn on the AMS (20%) and check for proper vacuum function (1.0–1.5 in. of WC).
- Place Glo-Germ particles onto the sample station and adjust either the particle concentration or the flow rate to achieve a particle's rate of 20,000 particles/s. Note: When creating aerosols, which could contain Glo-Germ particles, it is recommended that the operator uses full PAPR protection.
- Begin acquiring Glo-Germ particles and allow collection for 5 min at one or more locations.
- Turn off vacuum to the AeroTech concentrator and remove slide, mark slide as "test control" and put in a fresh slide. Continue collecting aerosols in "failure mode" with the AMS turned off for another 5 min, generating a "positive control." Stop sample acquisition and readjust waste catcher to normal position.
- Examine glass slides for bright green fluorescence using a fluorescent microscope equipped with a FITC filter (520–640 nm). In an extreme example of Glo-Germ particles contamination, a pattern of salt circles can be found on the slide and the plate cover. However, typically in the "positive control" only a few particles can be detected, and this pattern is not usually observed.
- Scan the "test control" and "positive control" slides with the 10× objective and count all Glo-Germ particles. Record all data using the electronic report file.
- Determine if acceptable tolerance is met. The acceptance tolerance is zero Glo-Germ particles detected after 5 min of active air sampling in front of the sort chamber door with no tube holder in place and the AMS turned on. The "positive control" slide must contain greater than 50 particles after 5 min of active air sampling with the AMS turned off and no tube holder in place.
a) If the "test control" slide is negative for Glo-Germ particles, the operator can proceed with sort.
b) If the "test control" slide is positive for any Glo-Germ particles, the operator must repeat the test, and if necessary, clean the AeroTech device with soap and water, followed by 70% EtOH.
c) If the test fails for a second time, infectious cell sorting must be ABORTED until the instrument can be verified for containment.
Instrument Sort Procedures: Special Considerations
Instrument Startup
- Power up cell sorter (buttons on left side of instrument), turn on computer and start DiVa program.
- Remove probe from 70% EtOH tank and let drain. Place probe into 10 L sheath tank.
- Select "Prime after tank refill" (select sheath tank from menu). Note: Two EtOH filters are in rotation; one in use for the day and one drying from the previous day.
- Completely drain 70% EtOH from filter not on instrument by loosening top stopcock (A), removing bottom stopcock (B), and unscrewing bottom outlet line (C).
- Remove sheath filter on instrument and replace with empty filter.
- Select "Prime after tank refil" (sheath tank, repeat 1×).
- Loosen stopcock on cart filter and wait for sheath to run out (approx. 1 min).
- Run "Fluidics Startup," repeat 1× and turn on stream.
Flow Cell Disinfection Procedure
This should be performed after each infectious sort and/or before shutdown.
- Turn off sort stream.
- Add a tube containing 10% bleach (with 24 h expiration) into the sample chamber.
- Remove nozzle and place in capped tube with 10% bleach for 30 min. Wash nozzle in deionized (DI) water. Install nozzle with plugged orifice (Aria I) or closed loop nozzle (Aria II). Fill a tube with a volume of 10% bleach equal to or greater than the volume of sample that was sorted. Select from the menu – Instrument>Cleaning Modes>Clean Flow Cell. Repeat until fluid is seen in tubing exiting the flow cell. Wait 30 or more minutes with 10% bleach in flow cell. Clean Flow Cell twice with DI water. Select from the menu – Instrument>Cleaning Modes>Long Clean>Clean Bulk Injection Chamber (Aria I).
- Replace plugged nozzle with cleaned nozzle.
- Add PBS or sample media to the sample chamber and run for a few minutes.
- Turn on stream and verify settings, if needed repeat Accudrop procedure to verify droplet location and proper drop delay.
- Continue with next sort or perform shutdown.
Aria Shutdown Procedure
Aria I procedure:
- Turn off sample stream.
- Remove probe from the 10 L sheath tank and place into 10 L EtOH tank.
- Select "Prime after tank refill" (select sheath tank from the menu). Repeat 1×.
- Select "Fluidics Startup" (this floods the plenums with 70% EtOH). Repeat 2×.
- Start stream and load 70% EtOH sample, run sample for 5 min.
- With stream still on, unload sample, shut down instrument by quitting the DiVa program.
- Place sample tube holder, nozzle cam and spring into tube containing 10% bleach for 30 min. Wash tube holder and cam in DI water and let air dry.
- Clean all surfaces around optical bench, sort block chamber and charge plates, sort collection chamber, sample introduction area, and sample tube holder(s) with a HYPE-WIPE 10% bleach towel and/or 10% bleach from a spray bottle.
- Turn off main power.
Aria II procedure:
- Turn off sample stream.
- Select "Fluidics Shutdown" in DiVa software. Remove nozzle and replace with closed loop nozzle.
- Connect air and fluid lines to the stainless steel EtOH tank. Note: When removing the fluid line from the sheath tank, the line can be disconnected from either before or after the sheath filter. However, transferring the line and the sheath filter to the EtOH tank disinfects the filter and fluid lines with EtOH. This does not damage the filter; residual EtOH is flushed upon instrument startup.
- Remove sheath probe from sheath tank and gasket from tank lid and spray with 70% EtOH and air dry in BSC. Autoclave sheath tank.
- Turn off main power.
Infectious Sort Procedures (see Note 2)
Sorting Procedures
- Verify that the cell sorter passes all tolerances of aerosol containment as described. If these tolerances are not met, infectious cell sorting is not permitted.
- For the operator, wear PPE as outlined. If the operator is not protected as described, infectious cell sorting is not permitted.
- Post a warning sign on the outside of the sort facility door. Limit access to two individuals during the sort procedure.
- Turn on the AMS and verify that it is working correctly. This device must have a flow of 1.0–1.5 in. of WC. If this tolerance is not met, infectious cell sorting is not permitted.
- Close all barriers around the sort chamber. If this is not done, infectious cell sorting is not permitted.
- While in a BSC, filter each sample through a 100 mm mesh prior to sorting. This reduces the potential for clogging and decreases the risk of creating aerosols.
- Remove sample from the BSC and place onto the sample station. Start sorting and monitor the sort performance using the Accudrop camera. If during the sort the stream is deflected (due in part to a clogged flow cell tip), the sorter is designed to stop automatically and block the sort tubes, at the same time the sort stream is turned off. The sort does not restart until the operator has cleared the clog. Use the following procedure to remove a clog from the cell sorter.
a) Remove sample from the sample chamber. Increase the air evacuation rate on the AMS unit to 100% and wait at least 60 s.
b) Turn off stream (unless turned off by the instrument in the automated shut-down mode) and then on again to see if drop delay and stream returns to normal pattern. If clog is not cleared, select the nozzle flush procedure and use a cleaning agent such as Coulter Clenz.
b) If the nozzle cannot be cleared, open the aspirator drawer and increase the air evacuation rate on the AMS to 100%. Wait 60 s and then close the aspirator door. Open the sort chamber and remove the nozzle. Replace with a new nozzle or decontaminate the nozzle in 10% bleach for 30 min before placing in a sonicator (located within a Class II BSC) for 2–5 min. Check for clear hole using the microscope.
8. Resume sorting with new a nozzle or the same nozzle that has been cleared of the clog. Repeat Accudrop procedure to verify droplet location and proper drop delay.
9. Do not remove any sample from the sort collection chamber until the sample acquisition has been stopped. Wait 30 s before opening the sort chamber door. This procedure clears aerosols from the sort chamber. After this time, sorted samples can safely be removed from the sort collection chamber (see Notes 3 and 4).
Proper Donning of PPE
The MaxAir PAPR System is to be worn at all times within the BSL-3 lab. The right side of this figure shows the helmet and battery design.
- Connect battery to helmet and turn on to ensure that the helmet fan is working correctly and turn OFF. Check lights inside helmet to ensure that they are GREEN (yellow or red indicates the battery requires charging).
- Place helmet inside face shield shroud.
- Check to determine that the HEPA filter is located over the helmet motor.
- Attach battery pack to belt on the inside of the respiratory suit and turn on battery.
- Pull on the Tyvek suit over the shoulders. Ensure that inner hood shroud is positioned under the suit and outer hood shroud is placed over the top of respiratory suit, adjusting the sleeves and booties to fit conformably.
- Attach gloves (double gloves) and disposable sleeves and check for proper airflow. The airflow should filter from the top of the helmet and exit out of the bottom of the shroud.
Removal of PPE
- Before leaving the sort facility and entering the anteroom decontaminate gloves with primary disinfectant and remove first pair of gloves.
- Once in the anteroom, remove shroud and gown using clean gloves, place potentially contaminated Tyvek suit into an autoclave bag.
- Remove and dispose of gloves into an autoclave bag.
- Wash hands before leaving the anteroom.

 Loading ......
