Introduction of Multiplexed Microsphere Suspension Array
While immunoassays have been driving advances in such areas as life science research, clinical diagnostics, biosurveillance, and food safety, recent developments in microsphere-based immunoassay technology may provide further improvements. With microsphere suspension-based arrays, it is possible to perform multiplex analyses, simultaneous analysis of multiple analytes in a single reaction, which can generate more data with less sample, reduced labor, cost, and analysis time. With traditional microplate ELISA, it is possible to perform high-throughput analysis, but only multiplex 5–10 different analytes at a time. By contrast protein microarrays can multiplex hundreds of analyses but with limited throughput and accuracy. With microsphere-based suspension arrays, it is possible to multiplex up to 500 analyses in a high-throughput format.
Luminex xMAP technology uses microspheres of a single size (5.6 μm) but with unique ratios of infrared and red internal dyes. Each microsphere set, therefore, fluoresces with a unique spectral ratio of these two wavelengths when the internal dyes are excited. The microspheres are available with a carboxylic acid modification of their surface. These can be covalently coupled to antibodies for analyte capture on the microsphere's surface. Subsequent detection is via a biotinylated detector antibody in a sandwich immunoassay format (see Note 1). After the addition of a fluorescent reporter (i.e., typically streptavidin–phycoerythrin), Luminex instruments can be used to analyze each sandwich immunoassay. Because each microsphere set features a unique spectral address, multiple assays (i.e., on microspheres attached to different antibodies) can be combined in a single reaction. Luminex instruments separate the microspheres for individual analysis by lining them up in a one-dimensional array via flow cytometry (i.e., Luminex 100, 200, and FlexMAP 3D), or by spreading them in a two-dimensional monolayer (i.e., MagPix). The 1D arrays are read, one bead at a time, via interrogation with a set of red and green lasers, while the 2D arrays are read via hyperspectral imaging using LED excitation and CCD imagery. The multiplex format of Luminex microsphere-based immunoassays allows for the detection of up to 50 analytes on the MagPix platform, 100 analytes on the Luminex 100 and 200, or 500 analytes on the FlexMap 3D in high throughput 96- or 384-well formats (see Note 2).
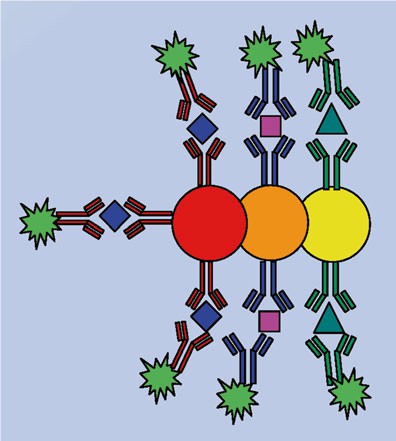 Figure 1. Schematic showing different bead sets with different spectral characteristics, each coupled to a different capture Ab, recognizing its respective different antigen.
All of these instruments determine which analyte is being measured through one fluorescent channel (i.e., the red microsphere internal dye), and the intensity of the signal through a second fluorescent channel (i.e., the green phycoerythrin tag), providing a readout in median fluorescent intensity (MFI) for each target (see Note 3). With the large surface area to volume ratio of the 5.6 μm microspheres, up to 100,000 capture antibody molecules can be coupled per microsphere. This relatively high density facilitates antigen binding for excellent sensitivity. Furthermore, because of the small size of the microspheres, the kinetics of the binding reactions approach solution-phase kinetics, even while the solid-phase nature of the microspheres forces the binding reaction equilibrium to favor the bound state. As with microplate format immunoassays, quantitative analysis may be performed using external standards to generate standard curves. Multiplex capability also facilitates the use of internal standards to correct for variations due to sample processing.
Luminex type immunoassays provide at least two major advantages over traditional antibody microarrays. One is that a user may choose to run any subset of the multiplex, conserving assay reagents and analysis time, while a microarray requires use of the entire array. Even more significantly, to be practical and economical, microarrays are printed at a commercial scale, and the user must choose between and among commercial offerings. On the other hand, the Luminex format allows a user to create individual assays and combine them to make custom multiplex assays. That particular benefit is the primary subject of this discussion. Furthermore, when MagPlex beads are used, a third significant advantage becomes apparent, because in this case the sandwich ELISA comprises an immunomagnetic pull-down experiment. A few thousand microspheres may effectively interrogate up to 50 mL of sample, recovering the analyte for further characterization.
Materials of Multiplexed Microsphere Suspension Array
Coupling Capture Antibody to MagPlex-C Magnetic Carboxylated Microspheres
- Capture antibodies.
- MagPlex Microspheres (see Note 4). One microsphere region for each target analyte. Refer to manufacturer's recommendation for compatible microsphere regions for multiplex assays.
- LoBind Eppendorf microcentrifuge tube.
- Activation Buffer: 0.1 M NaH2PO4, pH 6.2. Weigh 3 g Sodium phosphate monobasic, anhydrous bring to 200 mL with dI water. Mix and adjust pH to 6.2 with 5 N NaOH (see Note 5). Bring to 250 mL. Filter-sterilize and store at 4 °C, up to several weeks.
- PBS pH 7.4. 0.01 M phosphate buffered saline with 138 mM NaCl, 2.7 mM KCl. Weigh one packet of powder PBS. Bring up to 1 L with water. Filter-sterilize and store at 4 °C, up to several weeks (see Note 6).
- S-NHS: N-hydroxysulfosuccinimide Store at−20 °C. Warm to room temperature in a desiccator 1 h prior to use. Make fresh 50 mg/mL S-NHS in Activation Buffer on day of use.
- EDC: 1-ethyl-3-(3-dimethylaminopropyl) carbodiimide. Store at−20 °C. Warm to room temperature in desiccator 1 h prior to use. Make fresh 50 mg/mL EDC in Activation Buffer immediately before use.
- PBS–TBN: 0.01 M phosphate buffered saline with 137 mM NaCl 2.7 mM KCl, 0.1 % BSA, 0.02 % Tween 20, 0.05 % sodium azide, pH 7.4. To one packet of PBS, add 1 g of BSA, 0.2 mL of Tween 20, and 500 mg of sodium azide. Bring up to 1 L with water. Filter-sterilize and store at 4 °C, for up to 1 year.
- Equipment needed: vortex mixer, Branson 200 Ultrasonic Cleaner or equivalent sonicating water bath, Dynal RotaMix Rotator or equivalent rotator, DynaMag-2 Magnetic Particle Concentrator or equivalent magnetic separator for 1.5 mL microcentrifuge tubes, hemacytometer, light microscope.
Confirmation of Capture Antibody Coupling
- PBS–1 % BSA: 0.01 M Phosphate Buffered Saline with 137 mM NaCl 2.7 mM KCl, 0.1 % BSA, pH 7.4. To one packet of PBS add 10 g BSA. Bring up to 1 L with water. Filter-sterilize and store at 4 °C, up to 4 weeks.
- PE-antispecies IgG: R-Phycoerythrin-labeled anti-species IgG antibodies. Use appropriate PE-antispecies IgG to species of capture antibody. Dilute in PBS–1 % BSA to appropriate dilution.
- Equipment: Black 96-well round bottom polystyrene microtiter plate, LifeSep 96 F Magnetic Separator or equivalent 96-well plate magnetic separator, IKA MTS 2/4 Digital or equivalent plate shaker, Luminex 100, 200, FlexMap 3D or MagPix or any Luminex technology supported platform.
Immunoassay
- PBS–1 % BSA
- Capture Ab-Magplex: Capture antibody conjugated to Magplex microspheres as described below, diluted into PBS–1 % BSA.
- Biotinylated Detector Ab: Detector antibody conjugated to biotin, diluted in PBS–1 % BSA (see Note 7).
- SAPE: Streptavidin–R-Phycoerythrin. Dilute SAPE to 4 μg/mL in PBS–1 % BSA.
- Equipment: IKA MTS 2/4 digital plate shaker, vortex, LifeSep 96 F magnetic separator
Luminex 100/200
- Sheath Fluid.
- 70 % isopropanol.
- Bleach.
- DI water.
- Bio-Plex Calibration Kit.
- Bio-Plex Validation Kit 4.0.
MAGPIX
- MAGPIX Calibration Kit.
- MAGPIX Performance Verification Kit.
- 70 % isopropanol.
- 0.1 N NaOH.
Methods of Multiplexed Microsphere Suspension Array
Coupling Capture Antibody to Microspheres
For each target, couple capture antibody to spectrally unique microsphere. For multiplex reactions, ensure that microsphere regions are compatible by referring to manufacturer's recommendations (see Note 8). Microspheres and SAPE should be protected from prolonged exposure to light (see Note 9).
- Resuspend MagPlex microspheres by gently rotating at 20 rpm, 1–2 min for 1 mL of microspheres, or 10–15 min for 4 mL of microspheres.
- Transfer 5 × 10⁶ microspheres to LoBind Eppendorf tubes. Place tube in DynaMag-2 Magnetic Particle Concentrator for 30–60 s and use a micropipette to carefully remove supernatant from the small pellet.
- Remove tube from magnetic separator for 30–60 s and resuspend microspheres in 100 μL dH2O. Vortex for 20 s, and sonicate for additional 20 s to obtain a homogenous suspension.
- Place tube in magnetic separator for 30–60 s and remove supernatant. Resuspend microspheres in 80 μL Activation Buffer. Vortex for 20 s and sonicate for additional 20 s.
- Add 10 μL S-NHS 50 mg/mL to microspheres. Mix by vortexing.
- Add 10 μL EDC 50 mg/mL. Mix by vortexing.
- Cover coupling reaction tubes with aluminum foil and rotate at room temperature for 20 min.
- Place tube in magnetic separator for 30–60 s and remove supernatant.
- Remove tube from magnetic separator and resuspend microspheres in 150 μL of PBS pH 7.4. Mix by vortexing. Pellet using magnet, and remove and discard supernatant. Repeat wash in 150 μL PBS, then resuspend in 100 μL PBS.
- Add 5–12μg of capture antibody. Adjust final volume to 500 μL with PBS. Cover reaction tube in aluminum foil and rotate at room temperature for 2 h. Alternatively, agitate microspheres on rotator overnight in darkness at 4 °C.
- Place tube in magnetic separator 30–60 s and remove supernatant.
- Resuspend microspheres in 500 μL PBS–TBN. Vortex for 20 s and sonicate for additional 20 s. Cover coupling reaction tubes in aluminum foil and agitate microspheres on rotator at room temperature for 30 min.
- Place tube in magnetic separator 30–60 s and resuspend microspheres in 1 mL PBS–TBN. Mix by vortexing 20 s and sonicating for 20 s.
- Place tube in magnetic separator for 30–60 s, remove and discard supernatant, and repeat 1 mL PBS–TBN wash.
- Resuspend microspheres in 250–1,000 μL PBS–TBN.
- Determine microsphere concentration with hemacytometer on the microscope, according to the manufacturer's instructions. Store coupled microspheres at 4 °C protected from light, for up to 1 year.
Confirmation of Capture Antibody Coupling
- Resuspend microspheres by vortexing for 20 s and sonicating for 20 s.
- Prepare working microsphere mixture by diluting microspheres to 100 microspheres/μL in PBS–1 % BSA.
- Prepare twofold serial dilutions (4–0.5 μg/mL) of phycroerythrin labeled anti-species IgG antibodies using the correct species for each respective capture antibody, diluted in PBS–1 % BSA.
- Add 50 μL working microsphere mixture to microtiter plate wells, with additional well for negative control.
- Add 50 μL of each PE labeled anti-species detector to each of the appropriate wells. Add 50 μL PBS–1 % BSA to negative control well.
- Cover microtiter plate in foil and incubate at room temperature for 30 min with agitation on plate shaker.
- Place microtiter plate on 96-well plate magnetic separator for 30–60 s and remove supernatant.
- Wash microspheres in 100 μL PBS–1 % BSA twice.
- Resuspend microspheres in 100 μL PBS–1 % BSA. Mix by pipetting.
- Analyze on Luminex instrument.
View all Matched Antibody Pairs
Immunoassay
- Resuspend microspheres by vortexing for 20 s and sonicating for 20 s.
- Construct a multiplex assay by combining 100 microsphere/ μL of each set of microsphere in a single microcentrifuge tube. Place tube on magnetic separator 30–60 s and remove supernatant. Resuspend in PBS–1 % BSA to a concentration of 100 of each microsphere/μL and mix by vortex for 20 s and sonication for 20 s.
- Aliquot 50 μL of microsphere mixture to appropriate wells of microtiter plate (enough wells for samples + background) (see Note 10).
- Add 50μL PBS–1 % BSA to background well.
- Add 50 μL sample to appropriate wells.
- Mix by pipetting. Cover plate in foil and place on plate shaker at 800 rpm for 30 min at room temperature.
- Place plate on magnetic separator for 30–60 s and remove supernatant.
- Wash microspheres 2× in 100 μL PBS–1 % BSA (see Note 11).
- Remove plate from magnetic separator and resuspend microspheres in 50 μL PBS–1 % BSA, mixing with a micropipette.
- Prepare detector antibody mixture by adding all detector antibodies to single tube. Dilute to 1–4 μg/mL each antibody in PBS–1 % BSA. Add 50 μL detector antibody mixture to each well. Mix by pipetting.
- Cover plate in foil and place on plate shaker at 800 rpm for 30 min at room temperature.
- Place the plate on magnetic separator for 30–60 s and remove supernatant.
- Wash microspheres 2× in 100 μL PBS–1 % BSA.
- Remove plate from magnetic separator and resuspend microspheres in 50 μL PBS–1 % BSA.
- Dilute Streptavidin–R-Phycroerythrin to 4 μg/mL in PBS–1 % BSA and add 50 μL to each well.
- Cover plate in foil and place on plate shaker at 800 rpm for 30 min at room temperature.
- Place the plate on magnetic separator for 30–60 s and remove supernatant.
- Wash microspheres 2× in 100 μL PBS–1 % BSA.
- Remove plate from magnetic separator and resuspend microspheres in 100 μL PBS–1 % BSA. Mix by pipetting.
- Analyze microspheres on Luminex technology supported system.
Luminex Analysis
Perform daily startup, optics warm-up, calibration, validation, and sample height adjustment according to owner's manual. Ensure that waste container is empty, and sheath fluid is adequately full before use. After each day of use, perform shutdown (see Note 12).
- In Bio-Plex Manager v 6.0 (see Note 13), in describe protocol menu, click add panel. Enter < panel name > and select correct assay < Bio-Plex MagPlex Beads (Magnetic) >.
- In < Select Analyte > menu, click < Add Panel > button to open the < Add Analyte > window. Enter appropriate Microsphere Region number and name of analyte for that region. Repeat until all multiplexed microsphere regions and targets are entered.
- In < Select Analyte > window. Highlight desired microsphere region/targets from available list and click add button to move to the selected list (see Note 14).
- In Format Plate menu, Plate Formatting Tab, defi ne which wells in 96-well plate to analyze. Click Blank button, then highlight well or wells that contain blank (all components except for analyte). Click unknown button, then highlight appropriate wells with sample. Wells with unknown samples will be numbered.
- In Format Plate, Plate Groupings tab can be used to defi ne a group to calculate signal to background ratios for each well. Highlight all wells to be grouped. Click Group button. Select Ratio as Member/Reference. Check that Blank wells are solid color, or click Reference button to select reference well (see Note 15).
- In Enter Sample Info window, enter description of each sample for appropriate sample number.
- In Run Protocol window, select appropriate run conditions: Microsphere 50–100 per region, Sample timeout 120 s, run at High RP1 Target (see Note 16 ).
- Click eject button to open tray. Place 96-well plate in tray and click start button to start analysis.
- Bio-Plex/Luminex will display Median Fluorescent Intensity for each analyte.
- In the Report table Window, display ratio to see signal to background ratios. Determine appropriate threshold signal to background ratio to defi ne positive and negative samples.
MagPix
Perform adjust sample probe height, calibration, performance verification routines as described in operator's manual to ensure proper operation of instrument.
- Open Protocols page. In the Protocols tab, click < create new protocol >.
- Enter Assay Name, Version number, select microsphere number as 50, select qualitative for assay (see Note 17). Click < Next >.
- In the Analytes tab, click to highlight the appropriate microsphere region numbers. Enter analyte names for each microsphere region.
- Open Batch page. Click on Create < New Batch from existing protocol > and select appropriate protocol.
- Enter Batch name. In the Plate Layout tab, assign wells to be analyzed.
- Insert 96-well plate in MagPix and click < Run Batch > when ready.
- Median Fluorescent intensities will be displayed for each analyte.