Introduction of Lateral Flow Immunoassay Protocol
Lateral flow immunoassays (LFIAs), also known as immunochromatographic strip tests, first emerged in the commercial market in the 1970s with the development of home pregnancy test kits. These user friendly devices required no specialized training or invasive sampling, and gave users a qualitative answer within minutes of assay initiation. In vitro diagnostic device makers have since applied this technology to a wide array of analytical targets including for the identification of markers of infectious disease and toxic compounds, and for monitoring of metabolites indicative of drug use or the presence of disease.
View all Infectious Disease
View all Drugs & Chemicals
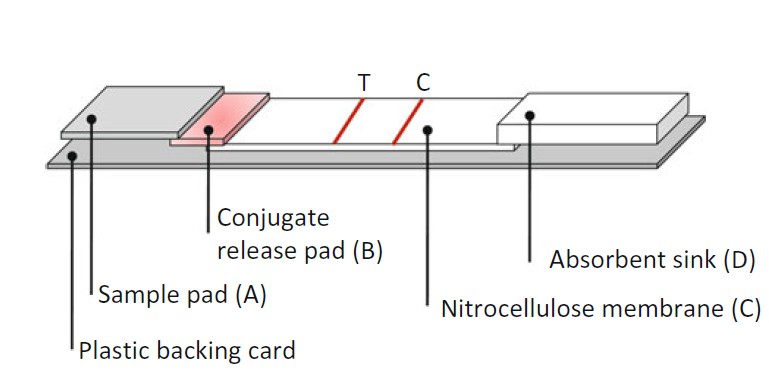 Figure 1. Schematic of a lateral flow device.
While LFIAs are simple and straightforward to operate for the user, their construction is complex, requiring a number of different solid materials and sophisticated biochemical reagents, the details of which are discussed here. At its core every LFIA depends on a labeled, mobile reagent and an antibody or analyte immobilized on the analytical membrane. LFIAs can be designed in two different formats, the direct format, which is essentially a sandwich ELISA, and the competitive format, which is an inhibition assay. The competitive format is generally developed for the detection of small molecules and will not be discussed here, but it should be noted that many of the same materials discussed below can also be employed in the competitive LFIA format. In the sandwich format, the focus of this chapter, a detector antibody, specific for the analyte of interest, is labeled with a visually detectable marker, such as gold nanoparticles or dyed polystyrene microspheres (these are sometimes erroneously called "latex beads") and dried onto a conjugate release pad. The conjugate release pad overlays the analytical membrane, usually composed of nitrocellulose cast onto a plastic backing. A second analyte- specific antibody is immobilized on the analytical membrane. An antibody that recognizes the Fc region of the detector antibody is also separately immobilized on the analytical membrane, and serves as a control to indicate that the test components are working. At the distal end of the membrane, a thick pad, referred to as the "absorbent sink" soaks up sample fluid, allowing continued capillary flow through the membrane.
To initiate the assay, the sample is applied to the sample pad and flows into the conjugate release pad, rehydrating the detector antibody. The sample and detector antibody interact as they flow into the analytical membrane. If the analyte of interest is present, it binds the labeled detector antibody. As the complex moves up the membrane, it passes the immobilized analyte-specific antibody, which recognizes and binds it, resulting in a colored line. The control antibody recognizes and captures the Fc portion of the detector antibody, also resulting in a colored line which serves as a control. Here we describe the basics of developing a lateral flow assay first by briefly discussing some of the important considerations in material selection, followed by a step-by-step protocol we developed in our laboratory and have used successfully to build a highly sensitive and selective LFIA that could detect and distinguish between two serotypes of Clostridia botulinum that cause human illness.
Materials of Lateral Flow Immunoassay Protocol
Although all LFIAs are made up of the same basic test components, materials must be selected based on the individual requirements of the assay. The fl ow properties of the analytical membrane and the absorptive capacity of the distal sink, for example, can vary widely depending on the material chosen. As an example, GE Whatman's Immunopore membranes have relatively slow capillary rise times, which increases the interaction time between test components and analyte as the test runs. In contrast, while also highly sensitive, their AE line of nitrocellulose membranes have much faster rise times, and are more appropriate for viscous samples or samples with a high particle load. Deciding the particular requirements of the LFIA to be built and gaining a working knowledge of the materials available from different manufacturers is critical to designing a test with high sensitivity and specificity.
- Backing card: The backing card serves as a platform for assembly of the different components of the test and is coated with a diagnostic grade pressure sensitive adhesive (PSA), which bonds materials quickly at room temperature with light pressure. PSAs manufactured for in vitro diagnostics (IVDs) are specially formulated so they will not interfere with test components (see Note 1). Protective release liners covering the card are typically manufactured with backsplits so the user can uncover certain portions of the adhesive as the test is assembled (see Note 2).
- Analytical membrane: The analytical membrane will contain immobilized capture antibodies and serve as the test platform (see Note 3). Nitrocellulose membranes are the most widely used in LFIA for a number of reasons. They have high protein binding capacity, true capillary flow characteristics and are relatively low cost. The production process for nitrocellulose membranes varies greatly between manufacturers. Choosing a supplier with experience in the manufacture of diagnostic grade membranes is critical to achieving reproducible results for an LFIA (see Note 4). As the market for LFIAs has increased, manufacturers have developed membranes with varying flow characteristics and sensitivities, and made considerable strides in improving CVs for capillary rise time, giving users more consistent results. In general, the capillary rise time of a membrane is inversely related to the sensitivity of the assay. In an ideal situation, the detector antibody has a fast on rate for its analyte, and binds immediately upon sample addition and rehydration. In reality, the time that the sample spends within the conjugate release pad before making contact with the analytical membrane is critical to assay sensitivity. An analytical membrane with a fast capillary rise time may not allow adequate time for detector antibody–analyte interaction, thereby decreasing the sensitivity of the assay. Application of capture antibodies to the analytical membrane should be performed using a quantitative dispensing system, such as the BioDot Quanti BioJet. This non- contact liquid dispensing system allows the user to control the amount of capture antibody applied to the membrane, which can greatly influence assay sensitivity (see Note 5).
- Sample pad: The sample pad receives the sample to be tested, but can also play an active role in preparing the sample for analysis. For example, a glass fiber sample pad can remove particulate matter from a sample, thereby improving flow and assay performance. If the pH of a sample needs to be adjusted prior to analysis, the sample pad can be pretreated with assay buffer prior to its assembly in the device. Sample pad pretreatment can also include the addition of blocking materials (e.g., synthetic polymers such as PVP or PVA), detergents and surfactants, all of which can improve assay sensitivity and sample flow.
- Conjugate release pad: The conjugate release pad contains dried, labeled detector antibody. Ideal materials for this component will hold the conjugate stably over the storage life of the test, and allow even rehydration and even release into the analytical membrane. Before the conjugate is applied, pads must be pretreated, either by the manufacturer or the developer prior to use. Pretreatment with blocking reagents and surfactants is typically done by immersion of the material in the pretreatment solution, followed by drying. Application of the conjugate itself can also be achieved by immersion, but this is not recommended. Ideally, conjugate is dispensed using a quantitative method, such as the BioDot AirJet Quanti dispensing system. The system is similar to an artist's airbrush, aerosolizing the conjugate. This system allows the user to control the amount of conjugate applied to the pad, and more importantly, dispenses the conjugate in an even layer on the surface of the pad. Release of the conjugate from pads prepared with such a dispenser is typically more efficient and higher than pads treated by immersion.
- Absorbent Sink: As the assay runs, the absorbent sink soaks up the sample fluid as it reaches the distal end of the strip. The sink is typically made from material with high absorptive capacity and is critical to preventing backflow of the sample which can result in high background signal and even false positives. GE Life Sciences manufactures a number of different sinks made of mixtures of glass fiber and cotton. The sink greatly affects the flow rate of the assay, as different materials have different wicking rates and absorptive capacities. When selecting a sink, one should consider the volume of sample to be applied.
- Antibody Pair: A lateral flow device functions much like a sandwich ELISA, using an antibody pair to detect the target antigen. High-quality antibodies are the key to assay sensitivity, and choosing between monoclonal, polyclonal, or recombinant antibody will depend on the specific needs of your assay. Capture and detector antibody pairs should be identified by screening in an ELISA format (see Note 6). The chosen detector antibody is labeled with gold nanoparticles (see below), dyed polystyrene microspheres or a fluorescent marker and is dried down in the conjugate release pad. The capture antibody is immobilized on the nitrocellulose (see below).
View all Matched Antibody Pairs - The antibody label: Gold nanoparticles or dyed polystyrene spheres are typical labels for detector antibodies in LFIAs. Antibody labeling with 40 nm gold nanoparticles is probably the most well-known strategy and can be accomplished by two methods: passive adsorption onto the particles or direct conjugation (see Note 7). Gold particles can be produced in any lab by citrate reduction. Producing a batch of particles with uniform size is more difficult, but is essential to the successful development of an LFIA. Many manufacturers of LFIA test components, such as Diagnostic Consulting Network, now offer small batches of gold sol at relatively low cost with particles of uniform size and at a specific optical density. This large volume of gold sol gives the user a significant amount of material with which to evaluate different test components, but does require a blocking step to prevent the gold surface from binding nonspecifically to other test components. Alternatively, covalent labeling kits are now available. Innova Biosciences InnovaCoat ® GOLD, for example, works to directly conjugate antibodies via lysine residues to 40 nm gold particles. This process requires less antibody than passive adsorption and also does not require an extra blocking step because the gold surface is protected from nonspecific protein binding by a proprietary coat. More recently, Innova introduced a directed labeling kit which orientates Fab' fragments on the surface of the nanoparticles and an Fc specific conjugation kit for orientated labeling of IgGs, effectively increasing the sensitivity of the assay.
- Sample Buffer: While not a structural component of an LFIA, the composition of the sample buffer must be considered. The pH of the buffer affects the performance of the antibody. Consider buffers with a neutral pH and low ionic strength, such as PBS or borate buffers. Surfactants such as Tween or Triton X-100 can be added to the running buffer, and can improve the flow rate. These reagents may also affect the affinity of the analyte for the antibody, so their use must be carefully considered. Blocking reagents can be added to the sample buffer as well. In general, it is best to use low concentrations of several different blocking reagents rather than one reagent at a high concentration.
Methods of Lateral Flow Immunoassay Protocol
Detector Antibody Labeling with Colloidal Gold
The structure of colloidal gold is a core of elemental gold surrounded by a shell of negative charge. The surface of gold nanoparticles has both hydrophobic and electrostatic characteristics. In its native state, the negative charges on the surface of the gold nanoparticles repel one another, and a colloidal suspension is maintained. Proteins are adsorbed onto the surface through hydrophobic forces. Labeling proteins with gold nanoparticles requires two determinations: (1) the optimal pH for adsorption to occur and (2) the optimal protein concentration to completely coat the surface of the gold. If the optimal pH is not determined, electrostatic interactions between the protein and sol will result in precipitation of the reagents. If the surface is not sufficiently coated, the gold will precipitate out in the presence of any salts that are part of the assay's buffer system.
Determination of Optimal pH for Adsorption
All pH determinations of gold sol should be performed using litmus paper as the gold will damage electrodes. The optimal pH at which adsorption occurs for a particular protein will be the pH at which electrostatic interactions are minimized and hydrophobic interactions prevail (see Note 8).
- Prepare 0.5 mL aliquots of gold sol with increasing pH values (increments of pH 0.5 using 0.2 M K2CO3 should suffice). The range should be around the isoelectric point of the ligand of interest. Mouse IgGs typically have a pI of 8.5.
- Add these suspensions to 50 μL of a 1 mg/mL aqueous solution of the IgG of interest.
- The smallest pH value at which flocculation, as described above, does not occur is the optimal pH for conjugation (see Note 9).
Determination of the Minimal Amount of Ligand Required for Conjugate Stability
The addition of salt to a suspension of colloidal gold will interfere with the repulsive charges between the gold particles, resulting in flocculation of the gold as described above. If the surface of the colloidal gold is sufficiently "protected" by adsorbed molecules, the addition of high concentrations of salts will have no effect on the colloid. This property can be exploited to determine the minimal amount of ligand required to stabilize the colloid.
- Adjust the pH of colloidal gold and the antibody to be conjugated to the pH as determined above with 0.2 M K2CO3.
- Prepare a range of antibody dilutions (1–50 μg/mL) in aqueous solution.
- Pipette 100μL of diluted antibody into a tube. Add 0.5 mL gold to each tube. Incubate 10 min at room temperature (The mixture should remain pinkish).
- Add 0.5 mL 10 % NaCl to each tube. If the gold has been sufficiently coated with antibody, the addition of salt should not affect the suspension. If an inadequate amount of antibody has been added, the gold will precipitate out, turning the solution a purplish color. The tube with the lowest antibody concentration that remains pink after the addition of salt represents the minimal amount of antibody required to stabilize the gold in suspension (see Note 10).
Conjugation of ms IgG to 40 nm Colloidal Gold
- Pipette 1 mL of colloidal gold into a small beaker.
- Adjust the pH as determined above using 0.2 M K2CO3.
- Add 10 % more antibody than the calculated amount to the gold.
- Incubate the mixture for 10 min at room temperature.
- Add BSA to a concentration of 1 %.
- Swirl gently.
- Transfer the mixture to a microfuge tube and spin at 15,000 × g for 30 min in a fixed-angle rotor centrifuge.
- Carefully aspirate the clear supernatant. Non aggregated gold conjugated IgG will pool at the bottom of the microfuge tube. The dark pellet on the side of the tube is aggregated gold that has not been coated with antibody.
- Slowly pipette off the pooled conjugated gold-IgG and transfer to a clean microfuge tube.
- Mix the conjugate with 0.5 mL 20 mM Tris, pH 8.2 with 1 % BSA. Centrifuge as before.
- Aspirate the supernatant and repeat step 10.
- Aspirate the supernatant.
- Suspend the conjugate in storage buffer (20 mM Tris, pH 8.2; 40 % glycerol; 1 % BSA; 0.01 % TX-100).
- Store at 4 °C.
Immobilization of Capture Antibodies Using a BioJet Quanti Liquid Dispensing Non-contact System
- Capture antibodies should be affinity purified and dialyzed in PBS at neutral pH.
- Cut a 300 mm strip of Immunopore FP membrane (25 mm width).
- Lay the strip down on the BioDot platform, aligning the edge of the membrane with the lip of the platform. Turn on vacuum to hold strip in place.
- Prepare test capture antibody dilutions ranging from 0.5 to 2.5 mg/mL in PBS containing 3 % methanol (see Note 11).
- Dispense test antibody 12 cm distal from the edge of the membrane at varying concentrations at a rate of 1 μL/cm in 40 nL drops (see Note 12). Mark the right edge of the strip where the capture antibody was laid down for future reference with a ball point pen.
- Dispense control capture antibody 4 cm distal from the test antibody at 1 mg/mL at a rate of 1 μL/cm in 40 nL drops. Again, mark the right edge at the end of the dispensed line.
- Use a test tube rack to hold the membrane (like a fi le in a fi le holder) and dry the membrane in a forced air drying oven for 20 min.
- Block the membrane by immersion in blocking buffer. You will need to determine the optimal blocking buffer for your system. Again, the best way to determine this is to test a number of different reagents. Most blocking reagents used in LFIA are applied at very low concentrations. For example, PVA and PVP are typically used at a concentration between 0.1 and 5 %. Fish gelatin, casein, and Tween are also other commonly used reagents. Block for 20–30 min at room temperature (see Note 13).
- Dry in a forced air drying oven for 20 min.
Preparation of the Conjugate Release Pad
Pretreatment of the conjugate release pad is necessary to ensure its stability during storage and for optimal release upon assay initiation. Hydrophilic polymers in low concentrations (i.e.,<1 %) are effective reagents to achieve good release.
- Cut a 6 mm × 300 mm length of Fusion5 (GE Healthcare). Pretreat the conjugate release pad by immersion in pretreatment solution. Again, you will need to determine what is best for your system.
- Dry the pad in a forced air drying oven for 20 min.
- Place the dried conjugation pad on the BioDot platform, aligning the bottom edge with the lip of the platform.
- Dispense conjugate at a rate of 1 μL/cm in 40 nL drops with the Y-axis set at 3 mm. The dispensed conjugate will have uneven edges.
- Dry the pad for 20 min in a forced air drying oven for 20 min, again using the test tube rack. Note that the side that was sprayed does not look the same as the side facing the platform.
Assembly of the Lateral Flow Device
- Remove the center backsplit from the plastic backing card.
- Wearing gloves carefully align the prepared analytical membrane (i.e., containing immobilized antibodies and completely blocked and dried) along the bottom edge of the exposed adhesive. Replace the backsplit over the nitrocellulose and apply gentle, even pressure to the membrane. Allow the membrane to rest for 20 min.
- Remove the remaining backsplits.
- Affix the absorbent sink with an approximately 2 mm overlap with the nitrocellulose.
- Affix the conjugate release pad with an approximately 2 mm overlap with the nitrocellulose. Be sure that the side that was sprayed is the side that is facing up. 6. Affix the sample pad (Standard 14, GE Healthcare) over the conjugate release pad with an approximately 2 mm overlap.
- Allow the assembled device to rest for 20 min.
- Cut strips in 5 mm width using a guillotine cutter (see Note 14).
- Place strips in cassettes.
- Store at room temperature with desiccant.

 Loading ......
